 Save
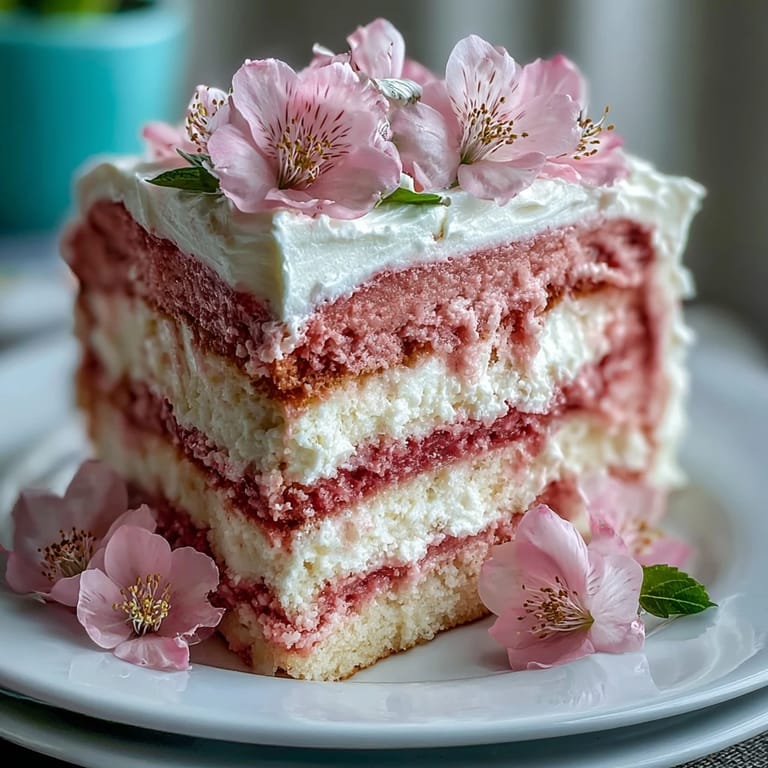
Save My sister texted me last April asking if I could make a cake for Mom's birthday, and I found myself standing in the kitchen at midnight scrolling through inspiration photos. That's when I saw it—a soft pink ombre cake with fresh flowers cascading down the sides, and something about it felt exactly right for the occasion. The next morning, I mixed the first batch of batter, and by evening, three layers of vanilla sponge were cooling on racks while I experimented with buttercream shades. It turned out to be one of those recipes that looks intimidating but actually rewards patience and a steady hand.
When Mom walked into the kitchen and saw that cake, she got quiet for a moment, then started laughing about how I'd always been the one to burn brownies growing up. Watching her cut into it at the table, seeing that pink gradient catch the light, made me realize this was never really about baking skill—it was about showing up with something made with attention and care.
Ingredients
- All-purpose flour (2 ½ cups): Measure by spooning into your measuring cup and leveling off; scooping directly creates dense, over-measured flour that can make the cake heavy.
- Baking powder (2 ½ tsp): Check the expiration date before mixing—old leavening agents won't give you that lift you need.
- Salt (½ tsp): This enhances vanilla flavor and balances sweetness in ways you won't consciously notice but absolutely will miss.
- Unsalted butter (1 cup plus 1 ½ cups): Room temperature butter is non-negotiable; cold butter won't cream properly and you'll end up with a dense crumb.
- Granulated sugar (2 cups): Creaming sugar into butter incorporates tiny air bubbles that create the tender crumb; this step takes a full 3-4 minutes.
- Eggs (4 large): Room temperature eggs blend seamlessly into the batter; cold eggs can cause curdling and dense texture.
- Pure vanilla extract (1 tbsp plus 2 tsp): Pure extract makes a real difference in flavor depth compared to imitation vanilla.
- Whole milk (1 cup): Room temperature milk prevents temperature shock when added to the butter-egg mixture.
- Powdered sugar (5 cups, sifted): Sift before measuring to remove lumps that can create grainy buttercream texture.
- Heavy cream or milk (2-3 tbsp): Start with less and add gradually; you control the consistency this way rather than ending up with soupy buttercream.
- Pink gel food coloring: Gel coloring doesn't add moisture like liquid coloring does, and you need only tiny amounts for vibrant shades.
- Edible flowers: Violets, pansies, and pesticide-free rose petals work beautifully; add them just before serving so they stay fresh.
Tired of Takeout? 🥡
Get 10 meals you can make faster than delivery arrives. Seriously.
One email. No spam. Unsubscribe anytime.
Instructions
- Prep your pans with intention:
- Preheat your oven to 350°F and grease three 8-inch round pans thoroughly, then line the bottoms with parchment paper. This double layer of protection ensures your cakes release cleanly without sticking.
- Combine your dry ingredients:
- Whisk flour, baking powder, and salt together in a medium bowl, breaking up any lumps. This distributes the leavening evenly throughout the batter.
- Cream butter and sugar until fluffy:
- Beat butter and sugar together on medium-high speed for a full 3-4 minutes until pale and noticeably fluffy. You're aiming for a mousse-like texture that's lighter in color than where you started.
- Incorporate eggs one at a time:
- Add each egg individually, beating well after each addition before moving to the next. This prevents the batter from looking curdled and ensures even distribution.
- Add vanilla extract:
- Mix in the vanilla after the final egg; you'll notice the batter become silky and fragrant.
- Alternate dry and wet ingredients:
- Add flour mixture in three portions, alternating with milk, beginning and ending with flour (flour-milk-flour-milk-flour). This technique prevents overmixing, which would develop gluten and toughen your cake.
- Divide batter evenly:
- Use a kitchen scale if you have one, or divide visually into three equal portions between your prepared pans. Even layers bake at the same rate and stack beautifully.
- Bake until a toothpick comes out clean:
- Bake for 25-30 minutes; the exact time depends on your oven's personality. The cake should spring back gently when you touch the center and a toothpick should emerge with no wet batter.
- Cool in pans, then on racks:
- Let cakes rest in their pans for 10 minutes (this prevents cracking), then turn out onto wire racks to cool completely. This takes about an hour and is worth the patience—a warm cake will crumb when frosted.
- Cream your buttercream base:
- Beat butter on high speed for 2-3 minutes until it's pale and creamy, almost mousse-like. This incorporates air that makes the buttercream fluffy rather than dense.
- Add powdered sugar gradually:
- Add sifted powdered sugar slowly on low speed, then increase to high speed after incorporating most of it. This prevents clouds of sugar from escaping your mixer bowl.
- Add vanilla and milk, then fluff:
- Mix in vanilla extract and milk (start with 2 tablespoons), then beat on high for a full 3 minutes. The buttercream should transform into an airy, spreadable consistency.
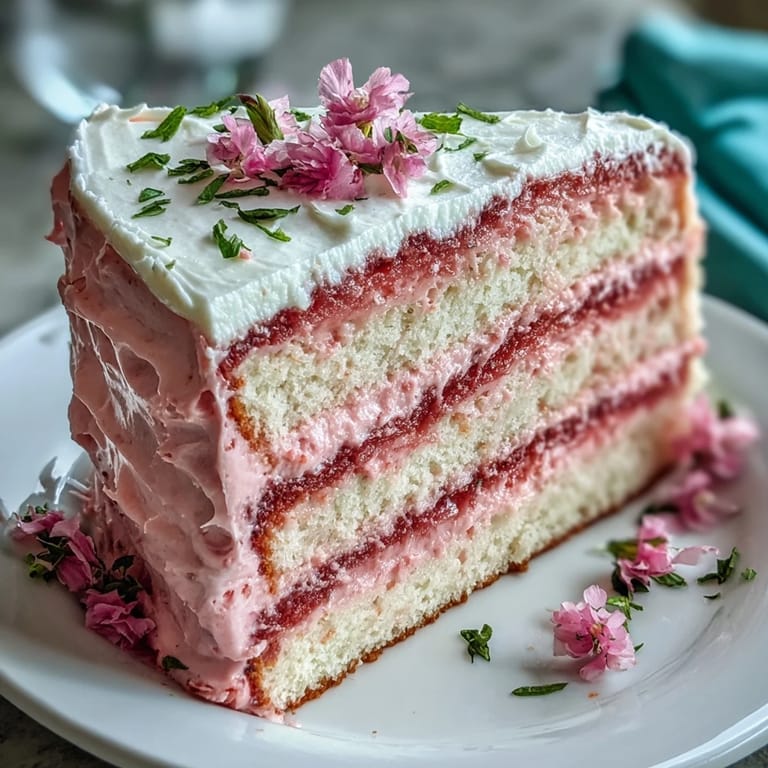
- Create your ombre effect:
- Divide the white buttercream into four bowls. Leave one white, then add increasing amounts of gel coloring to the other three: a tiny amount for light pink, a bit more for medium pink, and more still for the darkest shade. Gel coloring is concentrated, so start with a toothpick-dab amount.
- Layer and frost your cake:
- Place the first cake layer on your serving plate, spread the darkest pink buttercream on top, then stack the second layer. Spread medium pink buttercream, add the final layer, and cover the top with light pink buttercream.
- Frost the sides and blend the ombre:
- Spread the remaining white buttercream around the sides, then use an offset spatula to gently blend where the pink meets the white. If you want a more pronounced ombre, use a bench scraper to drag color from dark to light up the sides.
- Add your floral garnish:
- Arrange edible flowers on top and around the cake just before serving; this keeps them fresh and vibrant. If using decorative non-edible toppers, make sure to remove them before anyone takes a slice.
- Chill before slicing:
- Refrigerate the finished cake for at least 30 minutes so the buttercream sets. This gives you clean, beautiful slices rather than smudged frosting.
 Save
Save The next morning, I caught Mom in the kitchen at six o'clock staring at the leftover cake with a smile on her face, and I realized that this cake had become something to anticipate, not just consume. That's when I understood why people keep making the same recipes over and over—not because they're complicated, but because they create moments worth remembering.
The Magic of the Ombre Technique
The ombre effect isn't actually difficult once you understand the logic: you're creating a gradient by layering different shades of the same color. The trick I discovered is that gel coloring matters more than you'd think—a single drop changes the entire shade, so patience with the toothpick makes the difference between muddy pink and those Instagram-worthy gradients. If you mess up a shade and it's too dark, don't panic; you can always stir in more white buttercream to lighten it.
Timing and Do-Ahead Strategy
You can bake the layers up to 24 hours ahead and wrap them in plastic wrap at room temperature, or wrap and freeze for up to a week (bring to room temperature before frosting). The buttercream keeps in the fridge for up to five days in an airtight container, and you can make it several hours before assembly. The only thing you should do fresh is arrange the edible flowers, which wilts quickly once placed on the frosting.
Troubleshooting and Variations
If your cake layers crack while cooling, don't worry—the frosting covers imperfections beautifully. If your buttercream seems too soft to hold a shape, it probably needs more time in the fridge or you added too much milk; just chill it for 15 minutes and re-whip it. If you want deeper flavor, brush each cooled cake layer lightly with simple syrup (equal parts sugar and water, cooled) before frosting—it adds moisture without changing the crumb structure, and pairs especially well with the vanilla and flowers.
- For a lemon version, substitute 2 tablespoons of the milk with fresh lemon juice and add lemon zest to the batter.
- Edible flowers can be candied the day before by brushing with egg white and rolling in sugar, creating a more elegant finish.
- If you want to make this vegan, use plant-based butter and applesauce in place of eggs (use ½ cup applesauce plus 1 tablespoon cornstarch per egg).
 Save
Save This cake became the recipe I now reach for whenever I need to celebrate someone, because it sits at that perfect intersection of impressive-looking and genuinely achievable. Make it for someone you love, and watch what happens when they see that gradient.
Recipe FAQs
- → How is the pink ombre effect achieved?
Divide the buttercream into portions, tinting three bowls with increasing amounts of pink coloring, then layer from darkest to lightest for a smooth gradient.
- → What type of flowers can be used for decoration?
Edible flowers like violets, pansies, and rose petals add a delicate touch; remove any non-edible toppers before serving.
- → How to keep the sponge moist?
Brushing cooled cake layers with simple syrup before applying buttercream adds extra moisture and flavor.
- → What tools are needed for assembly?
An electric mixer, offset spatula, cake pans, and optionally a bench scraper help achieve smooth layers and ombre finish.
- → Can this be prepared ahead of time?
Yes, chilling the cake for 30 minutes before slicing helps maintain clean layers and enhances overall presentation.