 Save
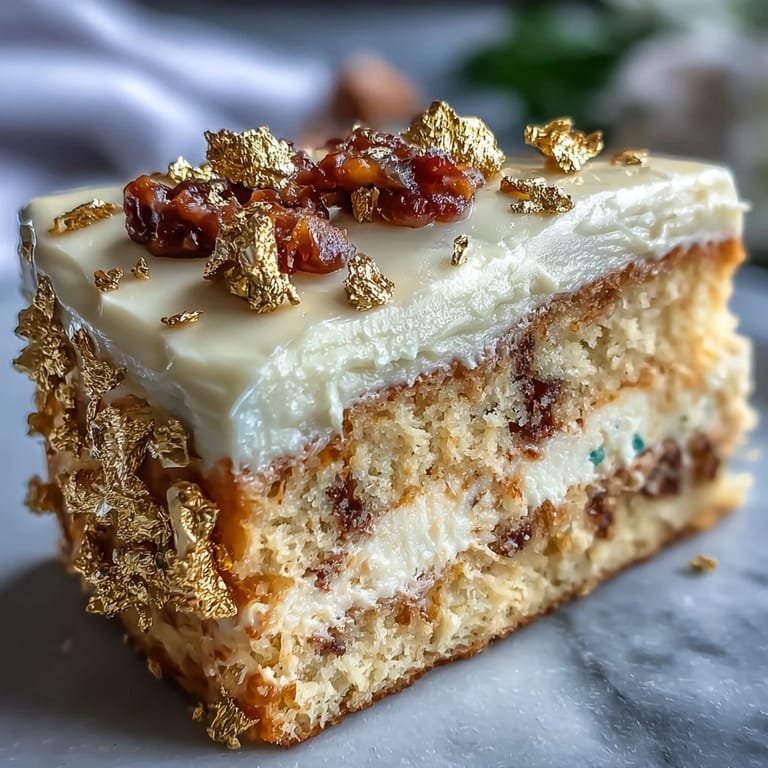
Save The aroma of vanilla and butter wafted through my kitchen as I carefully pressed gold foil onto the graduation cake, wondering if it would sparkle enough for the celebratory photos. I had never tried edible foil before, and the anticipation felt almost like a secret party. The idea for this cake came from a late-night group chat with friends, each exchanging stories about graduation and imagining the perfect send-off dessert. There’s something about the sound of mixers and laughter echoing together that makes special occasions even richer. Even as batter splattered on my apron, I felt the thrill of turning an ordinary Saturday into a milestone.
Last spring, I baked this cake for my niece’s graduation party, and halfway through decorating, the kitchen became a hub for family stories and silly photo poses. The diploma topper inspired a round of applause and a few tears, and even the youngest cousins insisted on helping with sprinkles. It wasn’t just dessert—it was the start of a new chapter surrounded by laughter, congratulations, and a little chaos. That day, the cake stood tall among confetti and handmade banners, but what I remember most was the joy in the room. Celebrations have a way of making simple recipes feel legendary.
Ingredients
- All-purpose flour: It creates a classic structure; sift for extra airy crumb and always measure precisely.
- Baking powder: This is essential for a lofty rise, so double-check your freshness before baking.
- Salt: Adding just a bit sharpens the flavors and balances sweetness.
- Unsalted butter: Using softened butter ensures a silky cake texture; leave it out until it’s spreadable.
- Granulated sugar: Beating it with butter makes the sponge light and tender.
- Eggs: Room temperature eggs help emulsify smoothly without curdling.
- Vanilla extract: The signature aroma ties everything together—a little goes a long way.
- Whole milk: It keeps the cake moist and lush; try not to substitute lighter milks.
- Powdered sugar: Sift to avoid clumps in the buttercream for silky results every time.
- Edible gold foil sheets: Adds instant celebration magic; handle gently with dry hands or tweezers.
- Diploma-shaped cake topper: For the fun, personalize with school colors or handmade designs.
- Sprinkles or star confetti: Optional, but adds a festive touch and excitement for younger guests.
Tired of Takeout? 🥡
Get 10 meals you can make faster than delivery arrives. Seriously.
One email. No spam. Unsubscribe anytime.
Instructions
- Get the Oven Ready:
- Set the oven to 350°F (175°C) and grab your pans. Grease and line with parchment so the cake releases without drama.
- Combine Dry Ingredients:
- Whisk the flour, baking powder, and salt together in a medium bowl. The gentle sound of the whisk sets a rhythm for the recipe.
- Cream the Butter and Sugar:
- Beat butter and sugar until they look pale and fluffy, about 3 minutes. It should smell heavenly and be lighter than you expect.
- Add Eggs and Vanilla:
- Drop in eggs one at a time, mixing after each, then stir in vanilla. The mixture should look silky and a little glossy by now.
- Mix Cake Batter:
- Alternate adding the flour mixture and milk, starting and ending with flour. Stop once everything comes together, being careful not to overmix.
- Divide and Bake:
- Pour the batter equally between pans and gently smooth the tops. Slide them into the oven and bake for 28-32 minutes until a toothpick comes out clean.
- Cool Down:
- Let cakes cool in their pans for 10 minutes, then turn them out onto wire racks. Wait until completely cool before frosting—patience pays off here.
- Create Buttercream:
- Beat butter until creamy and nearly white in color. Slowly add powdered sugar, vanilla, salt, and just enough milk for a soft, spreadable texture.
- Assemble Layers:
- Level the cooled cakes if needed. Place one cake layer on your serving plate, spread buttercream generously, and top with the second layer.
- Crumb Coat:
- Cover the cake lightly with frosting to seal in crumbs. Chill for 30 minutes so the final layer goes on smoothly.
- Frost and Decorate:
- Spread a thick, smooth layer of buttercream, turning the cake slowly for even coverage. This is the moment to channel your inner cake artist.
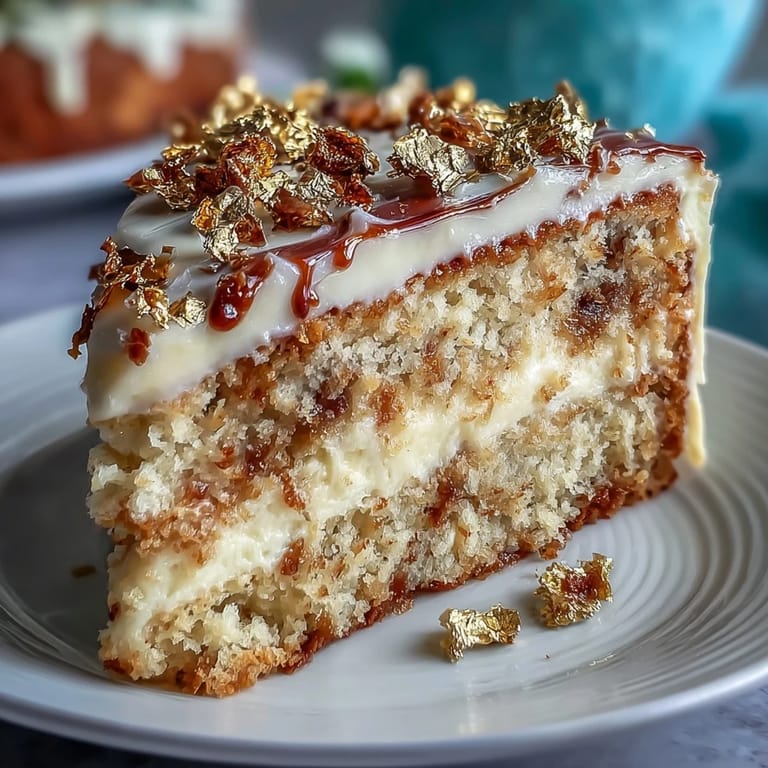
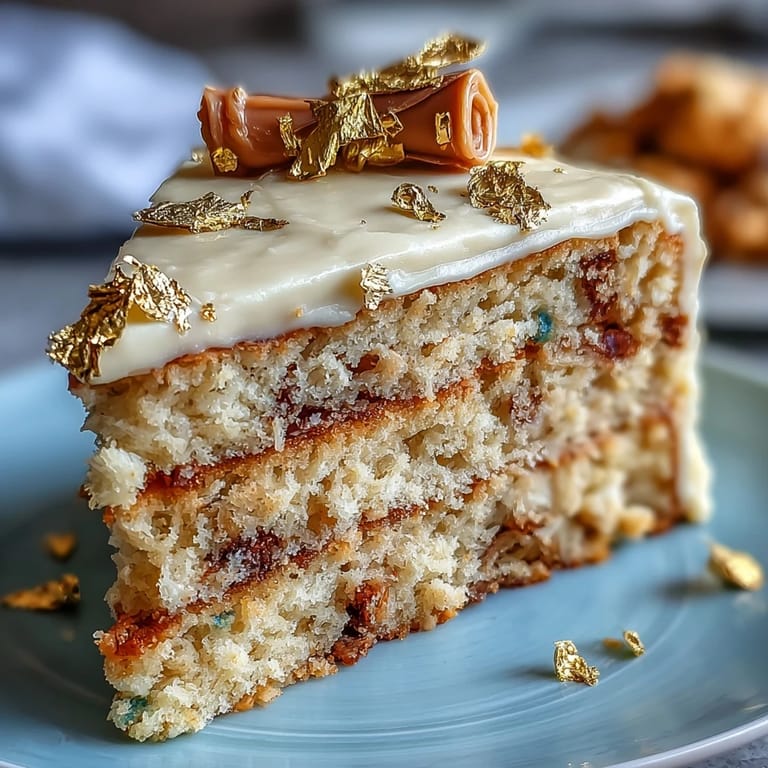
- Apply Gold Foil:
- With tweezers, gently press gold foil sheets onto the cake, arranging for maximum sparkle. Don’t rush—each piece makes a statement.
- Finish with Topper:
- Set the diploma topper on top or to one side. Add sprinkles or confetti for extra flair, then chill briefly to set.
- Serve:
- Slice and serve at room temperature, letting each piece shine in the celebration.
 Save
Save The day I brought this cake to our backyard graduation BBQ, it attracted a crowd before we could even finish setting up the table. Friends snapped so many photos that the gold foil glimmered in a dozen ways, and nervous grads crowded around, grinning in anticipation. Slicing through the buttercream, I overheard someone say it was "almost too pretty to eat," which felt like an unexpected triumph. Moments like these are why decorating turns into more than just flour and sugar. Suddenly, everyone finds themselves in the spotlight—even the cake.
Choosing Your Cake Topper
Making or selecting a diploma topper can be a fun way to personalize the cake for the grad. I’ve experimented with edible markers on fondant and even tried cutting paper scrolls for an extra crafty touch. There’s something creative about matching colors and shapes to the graduate's personality. If you have spare time and want a fully edible theme, get the whole family involved in shaping toppers together. The process turns simple decorations into keepsakes.
Decorating with Edible Gold
Applying gold foil always feels intimidating, so I learned to cut small sections and gently layer them with tweezers rather than fingers. One night, I got distracted and accidentally pressed a sheet too hard, tearing it—that taught me to work slowly and keep hands dry. The shimmer is worth the effort, though, especially in sunlight or under string lights. Try to plan out where you want the foil before starting so you don’t overdo it in one spot. Gold accents catch guests’ eyes and elevate the cake instantly.
Frosting for Smoothness and Style
For the silkiest finish, take your time with the crumb coat and chill fully before final frosting. Using a turntable makes smoother sides easier, but a simple plate and steady hand work in a pinch. Be sure to clean your spatula between passes to avoid streaks in the buttercream. Small details, like using gel coloring to match school colors, add that little extra magic. Frosting can be forgiving—so don’t stress if it’s not perfectly smooth the first attempt.
- Let the cake sit at room temperature for at least 20 minutes before slicing.
- If making ahead, store in the refrigerator and decorate just before serving.
- Buttercream is best whipped until light and fluffy—don’t rush this step.
 Save
Save Whether you’re celebrating big milestones or simply sharing a moment, this cake brings extra sparkle and delight. Enjoy every slice and let the cake be a backdrop for new memories.
Recipe FAQs
- → How can I ensure the cake stays moist?
Be sure not to overbake and use room temperature eggs and milk for a tender texture.
- → How do I apply edible gold foil?
Handle foil with dry hands or tweezers, gently pressing onto frosting areas for a shiny accent.
- → Can I customize the buttercream color?
Yes, gel food coloring can be added to buttercream to match school or celebration colors.
- → How do I make a diploma topper edible?
Shape fondant and use edible markers to create a diploma for a fully edible decoration.
- → What are suggested serving pairings?
Pair the cake with sparkling cider or champagne to complement graduation festivities.
- → What allergens should I be aware of?
The cake contains wheat, eggs, milk, and possibly soy from decorations like sprinkles.
- → Can I bake the cake layers ahead of time?
Yes, cake layers may be baked a day ahead and stored covered before decorating.