Save
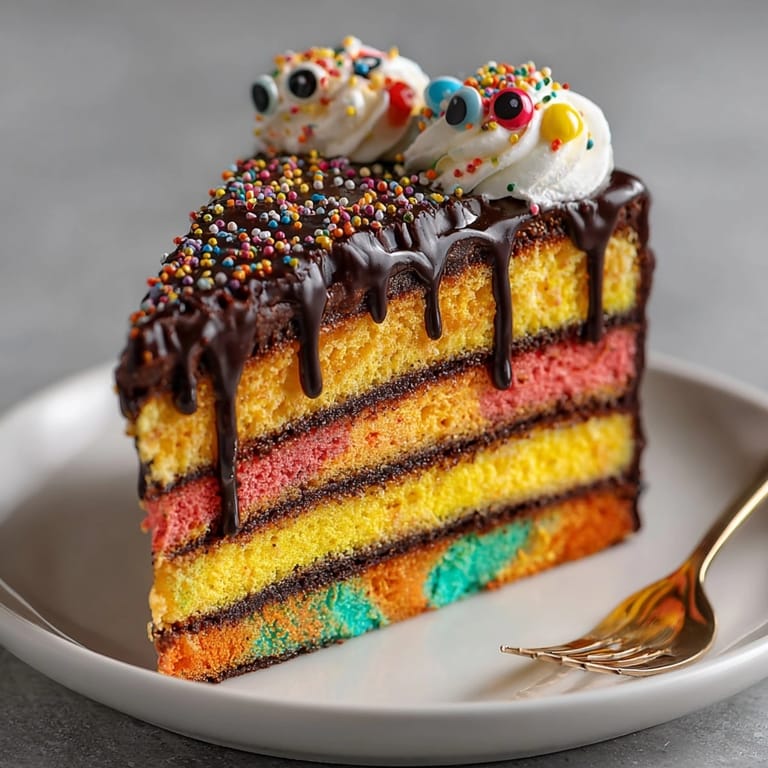
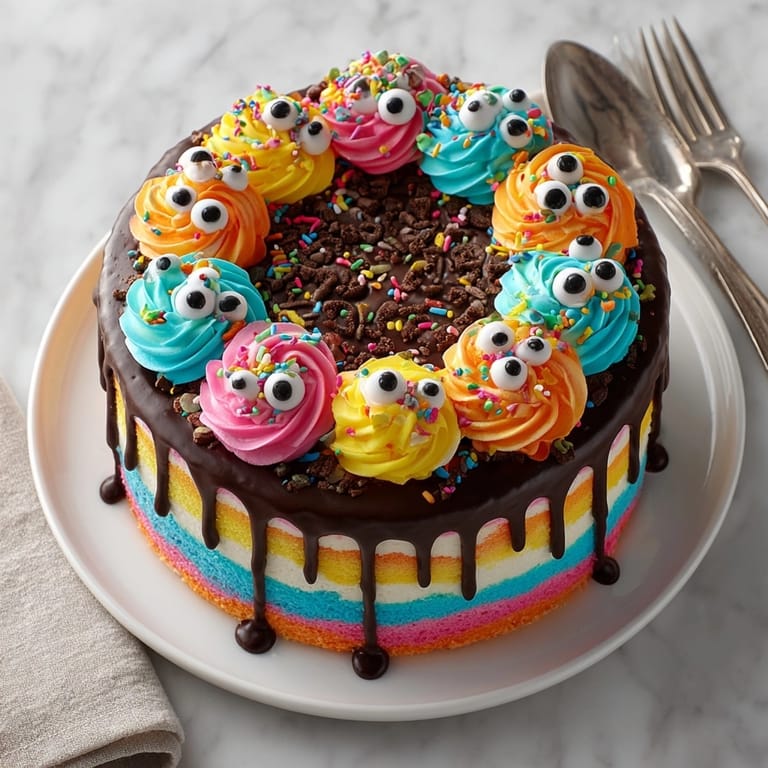
Save This vibrant Neon Monster Drip Layer Cake lights up any celebration. With bold neon stripes, fluffy buttercream, and a glossy chocolate drip, this showstopper is guaranteed to thrill at birthdays or festive parties. The marbled cake layers make slicing a true spectacle and every bite delivers pure nostalgia. This recipe brings a playful twist on classic layer cake: perfect for making memories and wowing your guests.
My favorite part is swirling the batter for marbled layers. The first time I made this for my niece’s birthday, everyone gasped when we sliced into the cake. Now it is a requested centerpiece for every colorful occasion in our family.
Ingredients
- All:purpose flour: gives good structure without heaviness go for unbleached for a tender crumb
- Baking powder and baking soda: help the layers rise evenly double check freshness for maximum lift
- Unsalted butter: ensures creamy flavor avoid salted so you control the taste
- Granulated sugar: sweetens and helps with the cake’s moistness look for fine crystals
- Large eggs: add richness and bind ingredients use at room temperature for easy blending
- Whole milk: makes layers soft and moist choose full:fat for best results
- Vanilla extract: adds delicate aroma pure extract always wins
- Gel food coloring: creates intense neon shades use toothpick for precise amounts
- Powdered sugar: in the buttercream gives a smooth finish sift well for no lumps
- Heavy cream: lightens the frosting stick with high:quality dairy for best texture
- Pinch of salt: enhances every flavor
- Semi:sweet chocolate chips: give a balanced taste for drip buy real chocolate not candy melts
- Oil:based gel food coloring: is needed to tint chocolate avoid water:based colors to prevent seize
Tired of Takeout? 🥡
Get 10 meals you can make faster than delivery arrives. Seriously.
One email. No spam. Unsubscribe anytime.
Instructions
- Prepare the Pans:
- Grease three eight inch round cake pans thoroughly and line bottoms with parchment paper to prevent sticking
- Mix Dry Ingredients:
- Whisk flour baking powder baking soda and salt together in a medium bowl to blend evenly
- Cream Butter and Sugar:
- Beat butter and sugar in a large bowl using an electric mixer for about three minutes until pale fluffy and doubled in volume this sets the cake’s foundation for moistness
- Add Eggs and Vanilla:
- Mix in eggs one at a time blending after each until fully incorporated then pour in vanilla stirring until smooth
- Combine Dry and Wet Ingredients:
- Alternate adding flour mixture and milk in batches beginning and ending with flour blend gently only until combined to keep layers tender
- Color the Batter:
- Split batter into five bowls tint each with a different neon gel color stir until vibrant and no streaks remain
- Marble and Bake the Layers:
- Spoon dollops of each colored batter into prepared pans swirl gently using a skewer for a marbled effect do not overmix bake at 350 F for thirty to thirty five minutes a toothpick should come out clean cool cakes in pans for ten minutes turn out to cool fully on wire racks
- Make the Buttercream:
- Beat butter until creamy add powdered sugar gradually then mix in heavy cream vanilla and salt divide frosting into five bowls tint each bowl with your favorite neon shade
- Layer and Fill:
- Level cake layers with a serrated knife if needed stack and fill using alternating neon buttercream smooth between each layer for evenness
- Crumb Coat and Chill:
- Spread a thin layer of buttercream all around the stacked cake this seals crumbs chill cake for thirty minutes to set before final frosting
- Final Frosting:
- Cover cake with generous swirls or stripes of neon buttercream using an offset spatula to blend colors for a monster look
- Prepare the Chocolate Drip:
- Heat heavy cream until steaming but not boiling pour over chocolate chips let sit for two minutes stir until silky smooth if you want colored drip blend in oil based neon food coloring
- Apply the Drip:
- Let chocolate drip cool until slightly thickened then drip around chilled cake edges using a spoon or squeeze bottle pause between drips to control flow
- Decorate:
- Finish with buttercream swirls on top sprinkles or add candy eyes for a whimsical monster vibe
 Save
Save I love playing with food coloring and my favorite layer is always neon green. The cake always makes everyone smile and I remember my son sneaking those candy eyes one by one after the crowd had left. It feels like a tradition now for us to mix up crazy monster faces on top.
Storage Tips
Keep cake covered at room temperature for up to two days or refrigerate up to five days tightly wrap individual layers in plastic for longer storage. Freeze unfrosted cake rounds for two months just thaw before assembling. Always chill before traveling to keep frosting and drip intact.
Ingredient Substitutions
For gluten free use an equal measure of a 1 to 1 gluten free flour blend. Plant based butter and dairy free milk and cream work for vegan adaptation. Try natural food colors or pastes if you want something more subtle than classic neon gels.
Serving Suggestions
This cake shines as a birthday centerpiece or at any party themed around monsters colors or the latest movie craze. Slice thick for drama each piece boasts a marbled surprise. Pair with vanilla ice cream or a scoop of whipped cream for extra fun.
Cultural and Historical Context
American layer cakes became party staples in the twentieth century with imaginative themes and colors a must. The Monster drip style riffed off pop art and social media feeds where playful cakes rule. This neon version channels joyful creativity for any season.
Seasonal Adaptations
Swap neon colors for pastels at spring celebrations. Use deep purples and oranges for Halloween parties. Mix in crushed peppermints or candy canes for winter magic.
Success Stories
Last year my cousin made this with her kids and the kitchen looked like a rainbow. It is honestly impossible to not smile while preparing those swirls. The cake keeps beautifully and was the talk of the neighborhood block party.
Freezer Meal Conversion
Bake the cake layers ahead wrap well and freeze. Prepare frostings and drip fresh on assembly day. Defrost layers before stacking and decorating to keep texture moist.
 Save
Save This cake delivers drama and joy in every marbled slice. Bring out your favorite colors and watch your next party light up!
Recipe FAQs
- → How do I achieve vivid neon colors?
Use gel food coloring in neon shades for both cake batter and buttercream. These provide intense, bright results.
- → Can I tint the chocolate drip?
Yes, but use oil-based gel food coloring to mix with chocolate; water-based coloring may cause it to seize.
- → How should I store the finished dessert?
Cover and keep at room temperature for up to 2 days or refrigerate for up to 5 days.
- → Is this suitable for gluten-free diets?
Absolutely! Substitute a 1:1 gluten-free flour blend for the traditional flour to make it gluten-free.
- → What tools help with the chocolate drip?
A squeeze bottle or spoon makes applying the chocolate drip around the cake edges easier and tidier.
- → How do I create a marbled effect?
Drop dollops of each colored batter into the pan and swirl gently with a skewer before baking.